Feeds:
Posts
Comments
# Zimbra 8.6 #
su – zimbra -c ‘zmmailboxdctl stop’
  • Install git on the Server (apt-get install git/yum install git), and then do a git clone of the project on the folder we want
    • Note: On RedHat/CentOS 6 you will need to enable the EPEL repository before install.

NEW
cd /letsencrypt
./letsencrypt-auto certonly
RENEWAL
cd /letsencrypt
./letsencrypt-auto renew
# choose option for Spin up a temporary webserver (standalone), then list the domain names you are obtaining or renewing certs for
cd /etc/letsencrypt/live/mail.example.com
nano chain.pem
# append missing part
-----BEGIN CERTIFICATE-----
MIIDSjCCAjKgAwIBAgIQRK+wgNajJ7qJMDmGLvhAazANBgkqhkiG9w0BAQUFADA/
MSQwIgYDVQQKExtEaWdpdGFsIFNpZ25hdHVyZSBUcnVzdCBDby4xFzAVBgNVBAMT
DkRTVCBSb290IENBIFgzMB4XDTAwMDkzMDIxMTIxOVoXDTIxMDkzMDE0MDExNVow
PzEkMCIGA1UEChMbRGlnaXRhbCBTaWduYXR1cmUgVHJ1c3QgQ28uMRcwFQYDVQQD
Ew5EU1QgUm9vdCBDQSBYMzCCASIwDQYJKoZIhvcNAQEBBQADggEPADCCAQoCggEB
AN+v6ZdQCINXtMxiZfaQguzH0yxrMMpb7NnDfcdAwRgUi+DoM3ZJKuM/IUmTrE4O
rz5Iy2Xu/NMhD2XSKtkyj4zl93ewEnu1lcCJo6m67XMuegwGMoOifooUMM0RoOEq
OLl5CjH9UL2AZd+3UWODyOKIYepLYYHsUmu5ouJLGiifSKOeDNoJjj4XLh7dIN9b
xiqKqy69cK3FCxolkHRyxXtqqzTWMIn/5WgTe1QLyNau7Fqckh49ZLOMxt+/yUFw
7BZy1SbsOFU5Q9D8/RhcQPGX69Wam40dutolucbY38EVAjqr2m7xPi71XAicPNaD
aeQQmxkqtilX4+U9m5/wAl0CAwEAAaNCMEAwDwYDVR0TAQH/BAUwAwEB/zAOBgNV
HQ8BAf8EBAMCAQYwHQYDVR0OBBYEFMSnsaR7LHH62+FLkHX/xBVghYkQMA0GCSqG
SIb3DQEBBQUAA4IBAQCjGiybFwBcqR7uKGY3Or+Dxz9LwwmglSBd49lZRNI+DT69
ikugdB/OEIKcdBodfpga3csTS7MgROSR6cz8faXbauX+5v3gTt23ADq1cEmv8uXr
AvHRAosZy5Q6XkjEGB5YGV8eAlrwDPGxrancWYaLbumR9YbK+rlmM6pZW87ipxZz
R8srzJmwN0jP41ZL9c8PDHIyh8bwRLtTcm1D9SZImlJnt1ir/md2cXjbDaJWFBM5
JDGFoqgCWjBH4d1QB7wCCZAA62RjYJsWvIjJEubSfZGL+T0yjWW06XyxV3bqxbYo
Ob8VZRzI9neWagqNdwvYkQsEjgfbKbYK7p2CNTUQ
-----END CERTIFICATE-----
cp * /opt/zimbra/ssl/letsencrypt/
chown zimbra:zimbra /opt/zimbra/ssl/letsencrypt/*
#as root user on zimbra 8.6 
cd /opt/zimbra/ssl/letsencrypt/
/opt/zimbra/bin/zmcertmgr verifycrt comm privkey.pem cert.pem chain.pem
cp -a /opt/zimbra/ssl/zimbra /opt/zimbra/ssl/zimbra.$(date “+%Y%m%d”)
cp /opt/zimbra/ssl/letsencrypt/privkey.pem /opt/zimbra/ssl/zimbra/commercial/commercial.key
/opt/zimbra/bin/zmcertmgr deploycrt comm cert.pem chain.pem
su – zimbra -c ‘zmmailboxdctl start’

Post more blog articles

Make more music

Have more fun 🙂

New Cert

linux Expert

Image

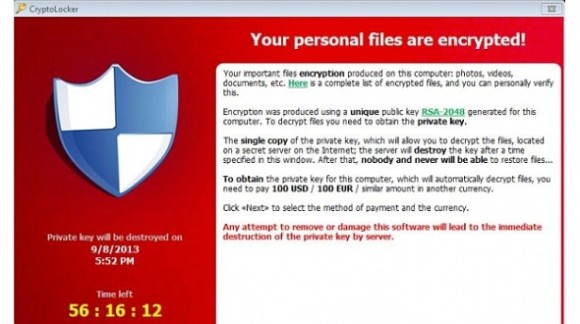
I will cut right to the chase …
If you get the following pop up on your computer, then its probably too late. I have had 3 seperate client offices affected by this virus. The first time I paid the ransom to decrypt my files. The 2nd and 3rd time I was prepared and had backups running with rsnapshot so I was able to go back several hours to before the infection encrypted my whole server. The user who initially had the infection lost all files on the desktop and my documents since those are not backed up.

Here are some useful links on the subject

Bleeping Computer has a lot of good info: <<<<LINK>>>>

Blocking executables in %AppData% (this is where the virus runs from): <<<<LINK>>>>

I used secpol.msc on a windows XP workstation to determine what needed to be blocked. I then went into the registry and exported the following keys so that I could use a login script to apply the keys to other workstations on the network.

####Reg file contents (import into registry windows XP #####

Windows Registry Editor Version 5.00

[HKEY_LOCAL_MACHINE\SOFTWARE\Policies\Microsoft\Windows\Safer\CodeIdentifiers\Paths]

[HKEY_LOCAL_MACHINE\SOFTWARE\Policies\Microsoft\Windows\Safer\CodeIdentifiers\Paths\{58dca1de-6e21-4b21-8010-0481e042ef55}]
“LastModified”=hex(b):e6,37,e8,fb,4c,c4,ce,01
“Description”=”dont allow executables from AppData”
“SaferFlags”=dword:00000000
“ItemData”=hex(2):25,00,41,00,70,00,70,00,44,00,61,00,74,00,61,00,25,00,5c,00,\
2a,00,2e,00,65,00,78,00,65,00,00,00

[HKEY_LOCAL_MACHINE\SOFTWARE\Policies\Microsoft\Windows\Safer\CodeIdentifiers\Paths\{dd6f32b9-d45e-4f13-bda8-dc4276b0c763}]
“LastModified”=hex(b):86,17,44,f8,4c,c4,ce,01
“Description”=”dont allow executable from subpath in AppData”
“SaferFlags”=dword:00000000
“ItemData”=hex(2):25,00,41,00,70,00,70,00,44,00,61,00,74,00,61,00,25,00,5c,00,\
2a,00,5c,00,2a,00,2e,00,65,00,78,00,65,00,00,00

#!/bin/bash
# Zimbra Backup Script
# Daniel W. Martin, 5 Dec 2008
# Original scripts:
#  http://wiki.zimbra.com/wiki/Open_Source_Edition_Backup_Procedure

touch /opt/backup/backup_$(date +%a).log

# Outputs the time the backup started, for log/tracking purposes

echo “Time backup started = $(date +%a) $(date +%T)” > /opt/backup/backup_$(date +%a).log
before=”$(date +%s)”

# Live sync before stopping Zimbra to minimize sync time with the services down
# Comment out the following line if you want to try single cold-sync only
# amended smc 3-28-13 zimbra 8 pre allocates 85GB to ldap dbase excluding folder from now on

rsync -avHK –exclude “/opt/zimbra/data/ldap” –delete /opt/zimbra/ /opt/backup/zimbra

# Including –delete option gets rid of files in the dest folder that don’t exist at the src
# this prevents logfile/extraneous bloat from building up overtime.
# Now we need to shut down Zimbra to rsync any files that were/are locked
# whilst backing up when the server was up and running.

before2=”$(date +%s)”

# Stop Zimbra Services

su – zimbra -c”/opt/zimbra/bin/zmcontrol stop”
sleep 15

# Kill any orphaned Zimbra processes

ORPHANED=`ps -u zimbra -o “pid=”` && kill -9 $ORPHANED

# Only enable the following command if you need all Zimbra user owned
# processes to be killed before syncing
# ps auxww | awk ‘{print $1” “$2}’ | grep zimbra | kill -9 `awk ‘{print $2}’`
# Sync to backup directory
# amended smc 3-28-13 zimbra 8 pre allocates 85GB to ldap dbase excluding folder from now on
# amended smc 3-28-13 using ldap util to backup ldap database correctly

su – zimbra -c “/opt/zimbra/libexec/zmslapcat -c /opt/backup/ldap”
su – zimbra “/opt/zimbra/libexec/zmslapcat -c /opt/backup/ldap”
rsync -avHK –exclude “/opt/zimbra/data/ldap” –delete /opt/zimbra/ /opt/backup/zimbra

# Restart Zimbra Services

su – zimbra -c “/opt/zimbra/bin/zmcontrol start”

# Calculates and outputs amount of time the server was down for

after=”$(date +%s)”
elapsed=”$(expr $after – $before2)”
hours=$(($elapsed / 3600))
elapsed=$(($elapsed – $hours * 3600))
minutes=$(($elapsed / 60))
seconds=$(($elapsed – $minutes * 60))
echo “”Server was down for: “$hours hours $minutes minutes $seconds seconds”” >> /opt/backup/backup_$(date +%a).log

# Create a txt file in the backup directory that’ll contains the current Zimbra
# server version. Handy for knowing what version of Zimbra a backup can be restored to.
# su – zimbra -c “zmcontrol -v > /backup/zimbra/conf/zimbra_version.txt”
# or examine your /opt/zimbra/.install_history
# Display Zimbra services status

echo “Displaying Zimbra services status…” >> /opt/backup/backup_$(date +%a).log
su – zimbra -c “/opt/zimbra/bin/zmcontrol status” >> /opt/backup/backup_$(date +%a).log

# Create archive of backed-up directory for offsite transfer

cd /opt/backup/zimbra
umask 0177
tar -zcvf /opt/backup/mail.backup_$(date +%a).tgz -C /opt/backup/zimbra/ /opt/backup/ldap .

# Transfer file to backup server

echo “Trasfer mail.backup_date.tgz to backup server@zimbra_backup.com:/opt/backup” >> /opt/backup/backup_$(date +%a).log
scp /opt/backup/mail.backup_$(date +%a).tgz root@zimbra_backup.com:/opt/backup >> /opt/backup/backup_$(date +%a).log
/bin/rm -rf /opt/backup/mail.backup_$(date +%a).tgz >> /opt/backup/backup_$(date +%a).log

# Outputs the time the backup finished

echo “Time backup finished = $(date +%T)” >> /opt/backup/backup_$(date +%a).log

# Calculates and outputs total time taken

after=”$(date +%s)”
elapsed=”$(expr $after – $before)”
hours=$(($elapsed / 3600))
elapsed=$(($elapsed – $hours * 3600))
minutes=$(($elapsed / 60))
seconds=$(($elapsed – $minutes * 60))
echo “Time taken: “$hours hours $minutes minutes $seconds seconds”” >> /opt/backup/backup_$(date +%a).log
echo “disk information:” >> /opt/backup/backup_$(date +%a).log
df -h >> /opt/backup/backup_$(date +%a).log
(echo “Subject: Backup Log $(date +%a)”;echo;/bin/cat /opt/backup/backup_$(date +%a).log) | /opt/zimbra/postfix/sbin/sendmail -F admin@zimbra.com -t sanga.c@zimbra.com


Alfresco updates

Added Wiki, data lists, calendar, discussions, blog and links to the ITM site. More to come

When setting up fetchmail to poll from servers with SSL security, you may recieve the follwing error flooding your logs

Mar 7 11:55:10 cs fetchmail[id#]: Server certificate verification error: unable to
verify the first certificate

This is caused from the servers cert missing in the local certificate store. below is 1 method for correcting this issue.

1. Install required packages (centos)

yum install openssl openssl-devel openssl-perl

2. Get certificate from mail server

openssl s_client -connect mail.it-mgt.com:995 -showcerts

3. copy everything from “—–BEGIN CERTIFICATE—–” to “—–END CERTIFICATE—–” to a file called mail.it-mgt.com.pem and save it in /usr/loca/etc/fetchmail/certs

4. look for the “issuer=’ line to find where the certificate was issued from. Go to the issuers website and obtain the “Base-64 encoded x.509” cert and save that to a file in the same location with extension .pem

5. run the follwoing command to hash the certs for use.

c_rehash /usr/local/etc/fetchmail/certs

6. In /etc/fetchmailrc At the end of each user line that polls the server whose cert we just added tot he local store add the following:

sslcertck sslcertpath /usr/local/etc/fetchmail/certs

I dont think you need the part about sslcertpath if you put the certs in yout default ssl certificate store.

usb boot disk osx

HOWTO:
Making a bootable USB drive from ISO image OS

2010 in review

The stats helper monkeys at WordPress.com mulled over how this blog did in 2010, and here’s a high level summary of its overall blog health:

Healthy blog!

The Blog-Health-o-Meter™ reads This blog is doing awesome!.

Crunchy numbers

Featured image

A Boeing 747-400 passenger jet can hold 416 passengers. This blog was viewed about 5,700 times in 2010. That’s about 14 full 747s.


In 2010, there were 10 new posts, growing the total archive of this blog to 19 posts. There were 12 pictures uploaded, taking up a total of 122kb. That’s about a picture per month.

The busiest day of the year was September 21st with 92 views. The most popular post that day was 2. Creating User Accounts.

Where did they come from?

The top referring sites in 2010 were google.com, chimac.net, google.co.in, google.co.id, and google.com.vn.

Some visitors came searching, mostly for hackintosh you need to restart your computer, you need to restart your computer hackintosh, zimbra, centos zimbra mail, and zimbra centos 5.4.

Attractions in 2010

These are the posts and pages that got the most views in 2010.

1

2. Creating User Accounts April 2009
2 comments

2

Zimbra Setup: CentOS 5.4 April 2010

3

hackintosh – You need to restart your computer May 2010

4

Squid Proxy with dansguardian Webfilter August 2010
2 comments

5

1. Install CentOS directory server April 2009
2 comments

first make sure the user account in BES has an IT policy with no settings. Then you can delete the account from the BES manager. You can choose to delete all exchange settings as well. This will mean that if the user account is ever reactivated with a blackberry, the saved info like BBM contacts, texts and call log will be gone.

Next step is to go to Options > Advanced options > Service Book
Delete all the entires containing the word ‘Desktop’

You will know have removed the BES configuration from the blackberry without wiping its settings.

Here is a list of desktop service books

Desktop [BrowserConfig]
Desktop [SYNC]
Desktop [OTASL]
Desktop [CMIME]
Desktop [MDS]
Desktop [BBIM]
Desktop [ALP]
Desktop [IPPp]
Desktop [CICAL]